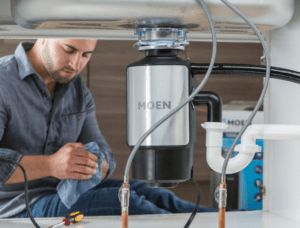
When it comes to the installation of garbage disposal, people who don’t know how to install garbage disposal may think that it is a complex or difficult process. But, in contrast with this general perception about the installation of garbage disposal, the process of installing it is simple and easier.
It is necessary for you to have some know-how about how to install a garbage disposal. Because you may need to replace your garbage disposal at any time if the previous one gets out of order. You can easily replace it. What you need to do is just follow the simple steps explained in this article.
However, if you don’t know how to install a garbage disposal for the first time, then it may be somewhat tricky for you and you need to follow the procedure carefully.
Contents
Steps To Follow While Installing Garbage Disposal:
1. Get The Required Equipment:

First of all, you need to get the required equipment along with some materials also. Make sure that you have the following equipment and material before you start installing your garbage disposal.
- Hammer
- Screwdriver
- Channel type pliers
- Plumber’s putty
- Wire nuts
- Strain relief fitting
Similarly, you may also need some extension pieces of the drainage pipe.
2. Removal Of The Previous Disposal Unit:
Before you start removing or detaching the older garbage disposal, it is necessary to turn off the garbage disposal and disconnect the electric supply. It is necessary so that the probability of getting electric shock or hand laceration may be reduced. And you are out of danger of these two problems.
After disconnecting electricity, start removing the garbage disposal. For this purpose, disconnect the garbage disposal from the connection through which it is attached to the drainage pipe or system. After that, unfasten the disposal unit from flange assembly. Then remove the flange assembly also from your kitchen sink.
However, it is necessary to mention here that you need not remove the flange assembly in case your new garbage disposal is of the same dimensions, features, and brand as that of the garbage disposal you are going to remove. In this case, the new garbage disposal unit will be compatible with the already installed flange assembly.
3. Installation Of A New Mounting Ring And Sink Flange:
In case your new disposal unit is not compatible with the older flange assembly, you have to remove the older one and install a new one in its place. This assembly surrounds the opening of the sink drain and makes the fitting feasible.
Then apply the plumber’s putty at the opening of the sink drain and fix the assembly containing the new garbage disposal unit. Secure and strengthen this connection between the garbage disposal and sink flange.

4. Fixing Of Mounting Assembly:
After the installation of the new mounting, the next step is fixing the mounting ring. The mounting assembly having garbage disposal mounting ring is the part of the assembly that connects the garbage disposal with the kitchen sink.
You can fix the mounting assembly by tightening three screws also known as mounting screws present on this assembly. Tightening of these screws will fix the mounting assembly tightly resulting in squeezing of the plumber’s putty. But, keep in mind not to overtighten these screws.
5. Connecting The Power Cord:
Before you mount your garbage disposal, make sure that you have connected the power cord to your garbage disposal. you can connect the power cord to your garbage disposal with the help of a strain relief setup.
First of all, remove your garbage disposal’s bottom cover plate. After that attach the strain relief fitting to the bottom of your garbage disposal. Then, pass the wire of the power cord through the strain relief setup. After passing the wire through strain relief fitting, tighten the strain relief clamps.
Connect the white wire of the power cord with that of garbage disposal. Similarly, attach a black wire from the cord with that of garbage disposal. and similar will be the case of ground wire (green colored).
6. Connection To The Dishwasher If Needed:
In some cases, the garbage disposal is connected to the dishwasher while not in other cases. If you want to connect your garbage disposal to the dish wash drain, then find out the dishwasher inlet point. Then remove the plug present in it by inserting any tool into it. After that connect your garbage disposal to the dishwasher by means of this inlet point.
7. Mounting Of Garbage Disposal:
The next step you need to do is mount your garbage disposal. For this purpose, put your garbage disposal in front of you. Then rotate the collar of your garbage disposal against three ears of it. And keep rotating it until your garbage disposal fits well with the drain fitting.
8. Connecting Garbage Disposal To Drainage System:
After mounting your garbage disposal, the next step is to connect it to the drainage system. Place garbage disposal in a position in which it is compatible with the drain fitting.
Then fix it in that place and make its connection with the drainage system. While making these connections, you can use extension pieces of the drainage pipe. After that check for leakage by flushing water and garbage disposal is ready to use.
Conclusion:
If you don’t know how to install a garbage disposal, this article will help you understand the installation of garbage disposal. You can install your garbage disposal by following the simple steps given above.
After learning the garbage disposal installation procedure, you will be able to replace your garbage disposal easily in case you feel your garbage disposal leaking or having any other problem.


Leave a Comment